How to use VVDI BIMtool pro programs BMW CAS key
Confirmed: VVDI BIMtool pro is able to program key for BMW CAS (CAS1/CAS2/CAS3/CAS3+/CAS4/CAS4+) via OBD, and Eprom program key for BMW EWS1/EWS2/EWS3/EWS4/CAS1/CAS2/CAS3 (include lost all key). In this post, you will have all details including operation instruction.
Part 1. OBD - CAS1/CAS2/CAS3/CAS3+/CAS4/CAS4+ main functions
Key Learn interface like:
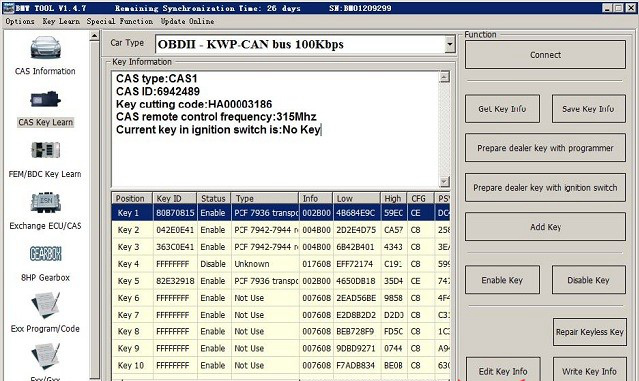
Mainly Function:
Key cutting code: Key This code can help make the key stick, you can use CONDOR Automatic Key Cutting Machine make the key stick directly (Lost All Key is very convenient, no need change cylinder)
CAS remote control frequency: You need select correct remote key accord this value, they must have same frequency. Of course you can test working key frequency with Remote Frequency Test( “F” button on VVDI – BMW device)
CAS key in ignition switch is: The position at immobilizer for ignition key.
Get Key Info: OBD read key cutting code, CAS remote control frequency, CAS key in ignition switch is, key info etc. You must read and backup original key info before OBD prepare key.
Save Key Info: Save the key info read by OBDII, the file is encrypted.
Prepare dealer key with programmer: After read key info success, select a key position, prepare dealer key with VVDI – BMW programmer.
Prepare dealer key with ignition switch: After read key info success, select a key position, prepare dealer key with ignition switch.
Add Key: Add the new prepared key to CAS system. Most of the car, the new prepared key can start engine directly without add key; there’s still a few car can’t identification new key, at this situation you need add key to CAS system, key should be placed in VVDI – BMW programmer.
Enable Key: Insert a working key to ignition switch, select key position which you want enable, press button Enable Key. If there’s a key for this position, it will start work again. Attention: Enable Key don’t need to read key info.
Disable Key: Insert a working key to ignition switch, select key position which you want disable, press button Disable Key. If there’s a key for this position, it will stop work, add key new at this position is also not work. Attention: Disable Key don’t need to read key info.
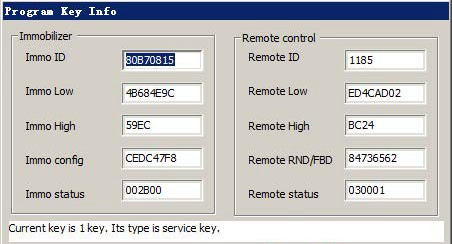
Edit Key Info: After you read key info or load key info, select a specify key item, run this operation to change detail item (PICTURE below). Attention: We don’t recommend general user run this operation, the working key will stop work if write error data.
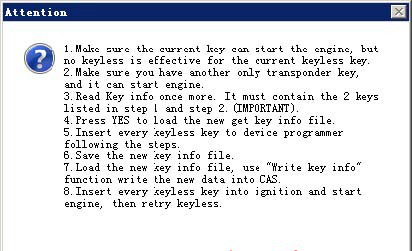
Repair Keyless Key: If the keyless key doesn’t have smart function after start engine. You can try this operation to fix it. Detail operation can follow (PICTURE below). Attention: you must have one un-keyless key and this key can start engine.
Write Key Info: Write the loaded key info to CAS system, it can use for restore original key info.
Special note in OBD operation(Important !!!)
Under Get Key Info get window (image below): For CAS3+ encrypt version, must select add key or lost all key. For other CAS version, this 2 method is same, they don’t have lost all key mode, add key is always.

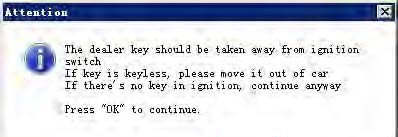
Under OBD operation get window (image below): If there’s key in ignition switch, take away. If the key is keyless key (smart key), move it out of car. If there’s no key in ignition, just press OK to continue.
Under prepare dealer key get window (image below): Once you get this window, VVDI-BMW detect this CAS is CAS3+ encrypt version. If you are sure CAS is encrypt version, but there’s no this window while prepare dealer key, the made key may not start engine. You’d better choose “File Make Key” for the error detection CAS.

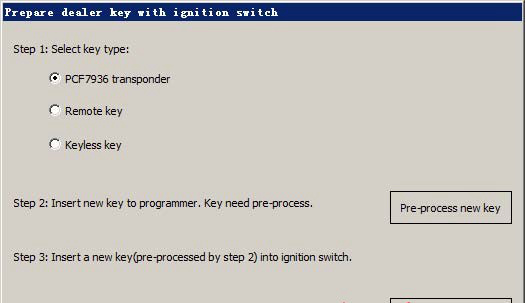
Under prepare dealer key with ignition switch get window (image below): Here we need pre-process new key. Just follow step1 to step4. Attention: You must insert new key into ignition switch before NEXT
Under prepare dealer key(File Make Key also have this) get window (image below): Please select correct type, if smart key select NO, the keyless function will not work.

Under prepare a keyless key (File Make key also have this) get window (the following picture 1) or (the following picture 1): Make sure the car have 1 keyless key at most before add new keyless key. The lost keyless key should disabled or erased.
Attention: If the "Warning" message comes up, it will come with add key, this situation keyless key don't support unlock; (the following picture 2)will come with lost all key, here the keyless key can unlock by VVDI BMW.
After make dealer key get window (image below): When you get this window, the key was made successfully. You can try to start engine directly. If not work, you need add this key to CAS system with Add Key. Keyless can fixed with Repair Keyless Key.
After add key to CAS get window (image below): When you get this window, the key was add to CAS system successfully. Key can start engine now. Sometimes add new key for CAS1/CAS2/CAS3 will cause car not start, you can follow chapter 4 Special Note 2.
Under lost all key for CAS3+ encrypt version (File Make key also have this) get window (PICTURE 5.14) or (below image 1): For CAS3+ encrypt version, lost all key will have a special procedure to make working key (this procedure maybe need load EEPROM dump). By insert temp key to ignition and try start. (below image 1) is CAS3+ encrypt version (not ISTAP) window, at most 16 times try start. (below image 2) is ISTAP version window, at most 64 times try start
Attention: For ISTAP version, There is a few car can’t find useful combine data after 64 times try start, because the CAS lost some verify data, you need select File Make Key->Known ISN to make working key Attention: If you press “Yes” and get something like “Cannot find useful combine data, please check the EEPROM file”, means the CAS lost some verify data, you need select File Make Key->Known ISN to make working key.
Under lost all key for CAS3+ encrypt version (File Make key also have this) get window (below image 1): In the title you can find “Try times 5” means this is the fifth try start. If can start, press “YES”,key made successfully. If cannot start, press “NO”, continue next try start For some reason cause not find start combine data after all try, the temp key is locked, you need unlock the key with EEPROM or key info before next time test.
Attention: when you get this window, you’d better try with this method: insert temp key to ignition switch, try start, if not start, take key off, then insert to ignition again, try start again, if still not start, take key off ignition and press “No” (In File Make Key you need place temp key in programmer) .
CAS3+ encrypt version (include ISTAP) make dealer key by OBDII
1. Add new key with working key
Attention: Under these steps, there will come some ASK or NOTE message,
Method 1 operation: This method support CAS3+ encrypt version (ISTAP not support). you can follow:
1) Read EEPROM with Read EEPROM in (PICTURE below) by OBDII 2) Make dealer key with File Make Key function.
Method 2 operation:
1) Insert a working key to car ignition and switch ON
2) (The first image above), use Get Key Info read CAS immo data, cutting code, remote frequency and etc. (Remember: when you get window (below image), you need choose Add Key) Attention: The key info can read directly if CAS isn’t ISTAP version. If CAS belongs to ISTAP version, there will be update CAS flash window (below image) for the first time read key info. Upgrade CAS flash only need 10 minutes, after update flash turn to step 5). If the upgrade progress failed by some reason, you can fix it with Menu->CAS Repair->ISTAP4* version OBDII Repair. Repair with CAS ID (write in step2)). Detail can be found in chapter 9 CAS Repair
3) In (The first image above), use Save Key Info save the read key info
4) There’s 2 methods for make key:
Method 1: In (PICTURE below), select Prepare dealer key with programmer.
a) Input a new blank key to VVDI2 programmer.
b) Select a key position for new key (If the selected position have key already, must use Add Key to add new key to CAS system).
c) In (The first image above), press button Prepare dealer key with programmer wait procedure complete.
d) After make dealer key successful, try start directly. If can start engine, turn to step 7). If not work, add the made key to CAS system with Add Key in (The first image above).
e) After new key can start engine turn to step 7). Attention: Sometimes add new key for CAS1/CAS2/CAS3 will cause car not start, you can follow chapter 4 Special Note 2.
Method 2: In (The first image above), select Prepare dealer key with ignition switch, select key type and pre-process the blank key, insert to ignition switch and wait complete. After finish, turn to step 7). If you get failure here, you need unlock the key with key info before next make dealer key.
5) Complete.
2. Lost All Key
Attention: Under these steps, there will come some ASK or NOTE message, they all can be found in chapter 5.2.
Operation steps:
1) Active OBD communication with lost all key method.
2) In (The first image above), use Connect to detect CAS type and read CAS identification information (Remember: Write down CAS ID).
3) In use Get Key Info read CAS immo data, cutting code, remote frequency and etc.
(Remember: when you get window (PICTURE below), you need choose Lost All Key)
Attention: The key info can read directly if CAS isn’t ISTAP version. If CAS belongs to ISTAP version, there will be update CAS flash window (PICTURE below) for the first time read key info. Upgrade CAS flash only need 10 minutes, after update flash turn to step 5). If the upgrade progress failed by some reason, you can fix it with Menu->CAS Repair->ISTAP4* version OBDII Repair. Repair with CAS ID (write in step2)). Detail can be found in chapter 9 CAS Repair.
4) In (The first image above), use Save Key Info save the read key info.
5) In (The first image above), select Prepare dealer key with ignition switch, select key type and pre-process the blank key, insert to ignition switch and wait complete. The procedure will use try start method, if CAS belongs to ISTAP there will be at most 64 time try start, while the not ISTAP version have at most 16 times try start. Once the engine start, turn to step 7). If you get failure here, you need unlock the key with key info before next make dealer key.
6) After success start engine, you will get window (PICTURE below). Remember: Don’t take away the key from ignition switch. Synchronize DME-CAS at least 10 times. Once you get “Don’t synchronize when you have working key” continue. If you got sync failed, don’t worry about this, the sync command is send. If you don’t complete this procedure, your new key may not start engine for second time.
7) Complete
Special note in File Make Key (Important!!!)
Prepare dealer key, keyless key, lost all key for CAS3+ encrypt version have some note in chapter 5. 2 Special note in OBD operation (Important!!!)
Load CAS EEPROM dump get window (PICTURE below): If the dump is read by BDM programmer, you can ignore this window. That means VVDI2 – BMW detected verify error in CAS system. Usually CAS3+ encrypt version have this window
Under make dealer key for CAS3+ encrypt version get (PICTURE below):
-Add key with working key select Have a working key.
-Lost all working key, there are 3 methods:
1) Have ECU dump file, load ECU dump file to continue
2) Known ISN, input 16 bytes ISN to continue
3) Use try start method, try start method don’t need OBD communication, only require the original CAS EEPROM dump
Under make dealer key for CAS4 encrypt version get (PICTURE below):
- Add key with working key select Have a working key.
-Lost all working key, there are 3 methods:
1) Have ECU dump file, load ECU dump file to continue
2) Known ISN, input 16 bytes ISN to continue
About remote function not work in CAS1/CAS2/CAS3/CAS3+: Remote not work caused by synchronization codes not same between key and CAS, just need do the synchronize operation: Press any button on new key, now remote function not work, start engine with this key for several seconds, switch off ignition, try remote again, works.
About write back new dump after make key for CAS1/CAS2/CAS3/CAS3+:
File make key not detected the key is disabled or not. If your key not work, you’d better enable the new key position with working key(Direct enable key without get key info).
If select a blank position for new key, usually don’t require write back new dump. If not work,test write back method.
If select a used position for new key, you must write new dump back to CAS.
Please don’t choose 10th key for CAS3+ encrypt version.
Under lost all key for CAS3+ encrypt version get window (PICTURE below): This window will come after first time write key. When you get this window, first try data was written to temp key. Here will save a new dump contain temp key ID. Insert temp key can switch on ignition (you can try for twice, only for cluster show), don’t write new dump back (CAS3+ encrypt version with new key in blank position don’t need write back). If you try several times still can’t switch on, need write back new dump. Note: make sure the new key position is not disabled.
EPROM-EWS1/EWS2/EWS3/EWS4/CAS1/CAS2/CAS3 (include lost all key)
Attention: Under these steps, there will come some ASK or NOTE message, they all can be found in chapter 6.1
Lost all key have same method with add key with working key.
Menu->File Make Key ->select right EWS/CAS type, load EEPROM dump file(BIN file)
The following image is File Make Key window after load EWS3 EEPROM dump. Key Type show with “PCF 7935 EML used” means there already have a key; show with “PCF 7935 EML not use” mean this position doesn’t have key. Select a key position, input blank PCF7935 transponder, press button “Make Dealer Key” and wait complete. The key can start engine without write new dump back, so we don’t have new dump for save.
The following image is File Make Key window after load CAS2 EEPROM dump (CAS1, CAS3 is same). Key ID show “FFFFFFFF” means this position not use; show with other values mean there already have a key. Select a key position, input a blank transponder (HITAG2), press button “Make Dealer Key” and wait complete. After finish will save a new dump file. About the write new dump file back you can find in chapter 6.1 About write back new dump after make key for CAS1/CAS2/CAS3/CAS3+.